

How To Connect The Arms To The Torso Drawing
Introduction
Hi all! My name is Dani Puente, and today I will requite yous some guidelines to larn and better drawing human artillery easily and speedily.
It is essential that, as illustrators or people who honey illustration, we know some anatomy since this is ane of the fundamental pieces to abound as artists and to ameliorate the quality of our illustrations. An incorrect, disproportionate posture or errors in the extremities can ruin our last work. However, and since anatomy is not elementary, in this tutorial, I will give you the keys to depict arms in a real, anatomical, and credible way.
I hope that my advice will help you lot learn a little more about the human body and motivate you to continue learning.
Are you ready?
Proportions
To start drawing the limbs of a human body, proportions are the showtime thing that we must know well. In this example, I will focus on those of the arm.
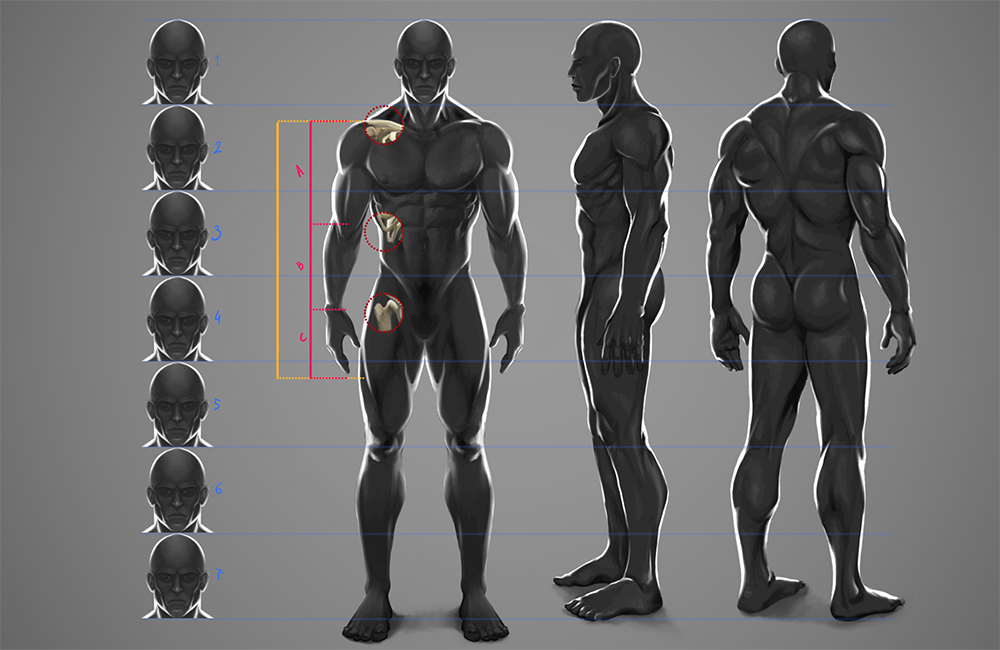
Every bit yous can come across in the following prototype, the arm tin be divided into iii parts. I will take the dimensions of the residue of the body as a reference.
The beginning function goes from the shoulder to the elbow (A). This function begins at the collarbone and ends at the level of the final rib. The second part is the forearm, which extends from the elbow to the wrist (B) specifically, at the elevation of the femur'due south head. And the tertiary is the hand (C), which goes from the wrist to the fingertips and ends approximately at the center of the thigh. I will bear witness yous all of this in more detail throughout this tutorial.
Written report the following cartoon carefully:
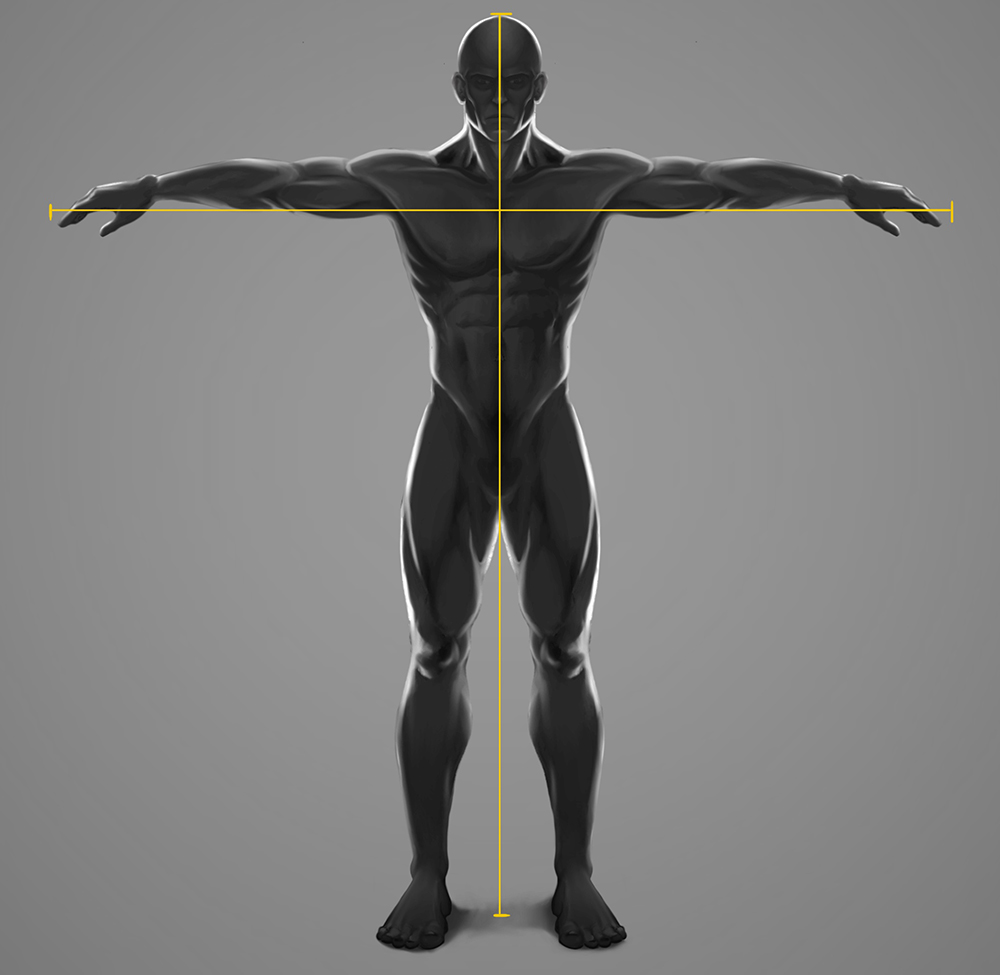
Some other important point is never to forget that the length of the arms outstretched is equal to the individual'south height from the shoulders down.
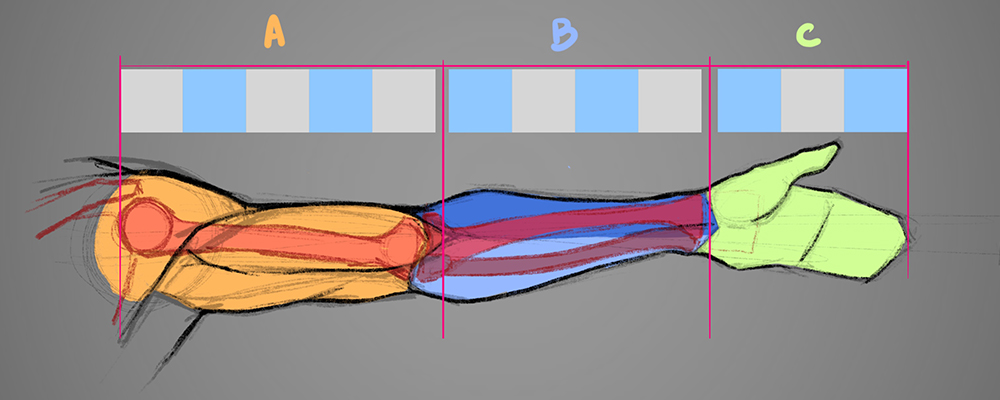
Now permit us focus on the proportions of the arm. As I said, the arm is divided into three parts: the arm, the forearm, and the mitt. However, I am going to focus on the arm and the forearm.
The top part of the arm, which is the longest (A), is the humerus, a strong and long bone that starts at the shoulder and connects to the elbow, connecting at the joint in the forearm (B).
The bones that brand up the forearm (B) are the ulna and the radius (ruby). These bones connect at a joint and are responsible for turning the wrist.
If you lot divide the length into 12 portions, you can see that A is the longest part, with five units, the forearm (B) has four units, and the hand (C) has iii units.
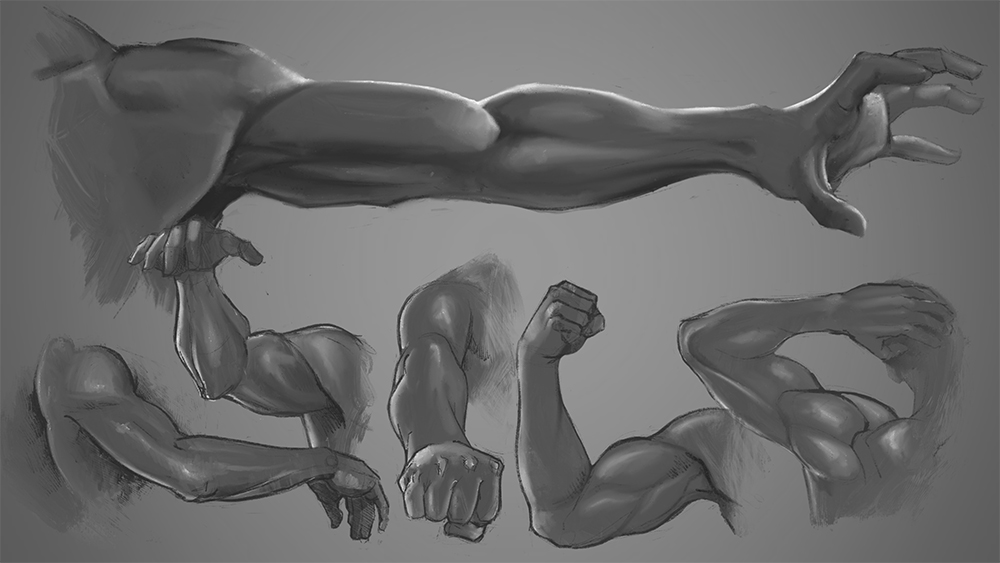
Construction
Once you lot understand the proportions of your arm, yous can and then familiarize yourself with its shape and empathize its musculature. The insertion of the muscles is like a chain.
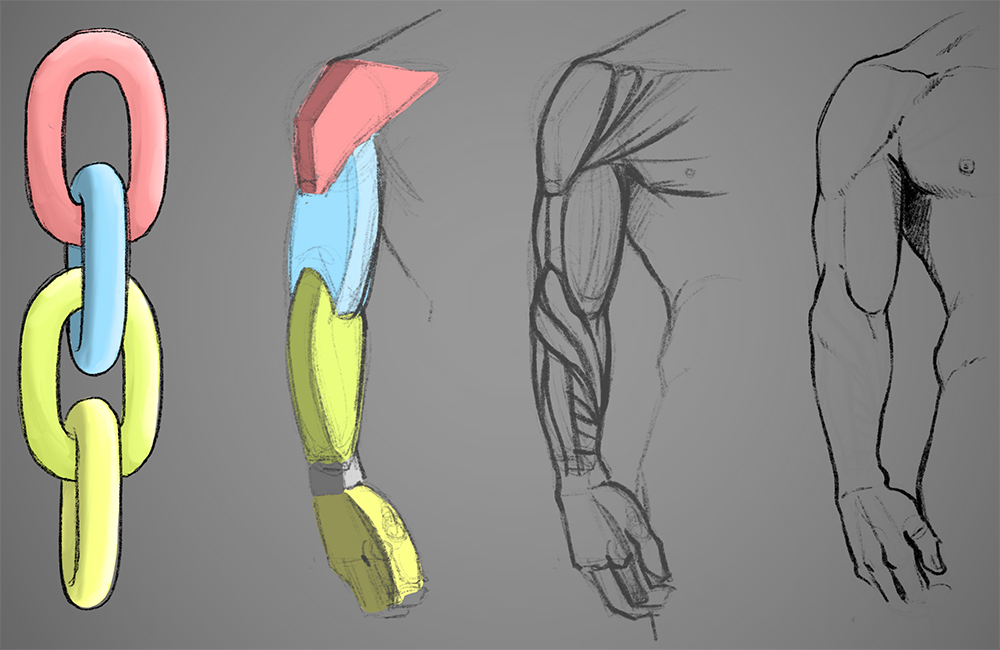
A useful guide for constructing an arm is to include the line formed past the subcutaneous points or bones that can exist perceived through the skin, such as the collarbone, elbow, and head of the ulna at the wrist.
Take a look at the post-obit prototype:
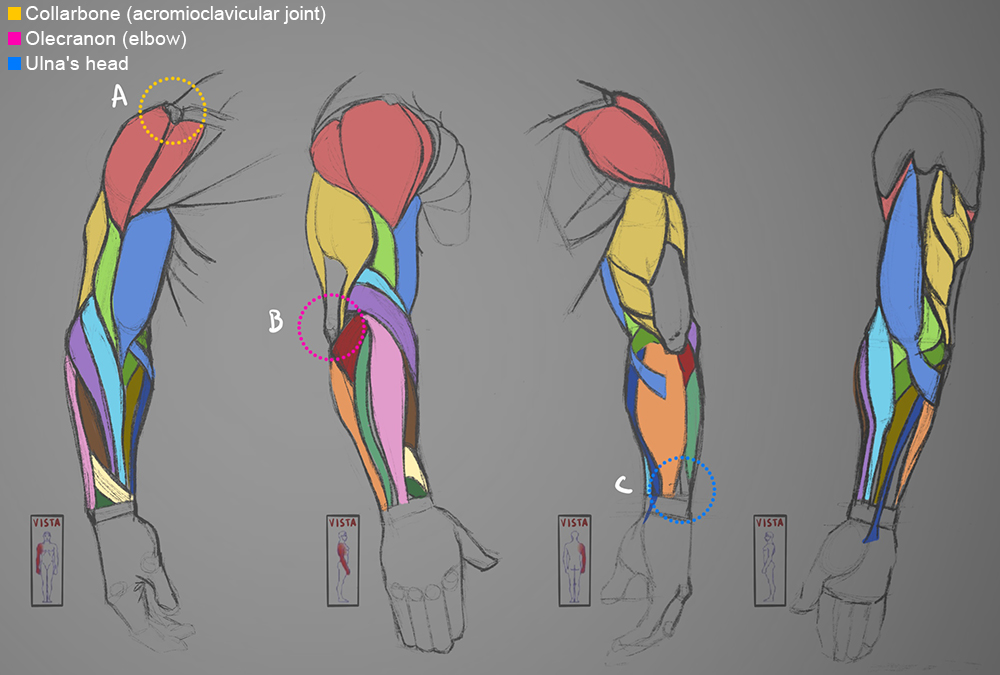
Muscle Anatomy
To larn and be able to realistically draw the arms of your graphic symbol, it is amend to know how to locate the most of import muscles of the limb you are studying. Whatever your manner, knowing them will be useful in achieving the right shape, which will enrich your illustrations.

Hither you can see in more item the aforementioned subcutaneous points in areas A, B, and C.
![]() Deltoid
Deltoid
![]() Triceps
Triceps
![]() Biceps
Biceps
![]() Brachialis
Brachialis
![]() Brachioradialis
Brachioradialis
![]() Carpi radialis longus muscle
Carpi radialis longus muscle
![]() Extensor digitorum musculus
Extensor digitorum musculus
![]() Extensor carpi ulnaris
Extensor carpi ulnaris
![]() Flexor carpi ulnaris
Flexor carpi ulnaris
![]() Anconeus
Anconeus
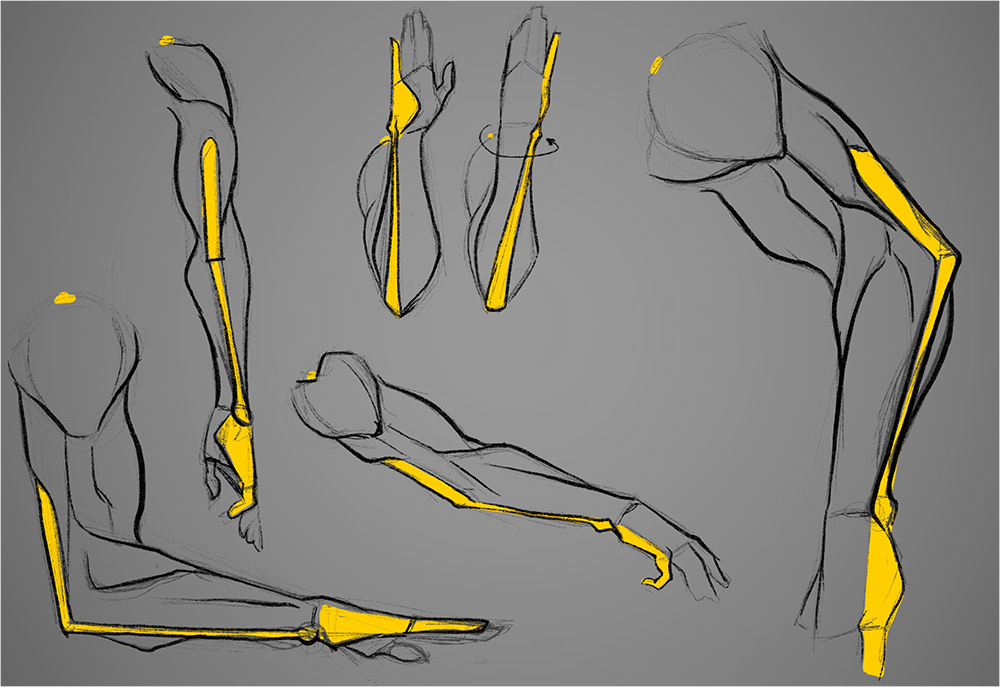
Movement and Rotations
On many occasions, the arm can be hard to describe due to all its movement options: vertical, horizontal, diagonal turns, rotations, etc. This is because the caput of the humerus is rounded and allows almost 360º mobility. Therefore, information technology is i of the greatest difficulties when drawing artillery. Let me show you some rotation movements to help you solve these issues in your illustrations. Await closely at how the radius bone spins on the ulna during the rotation move.
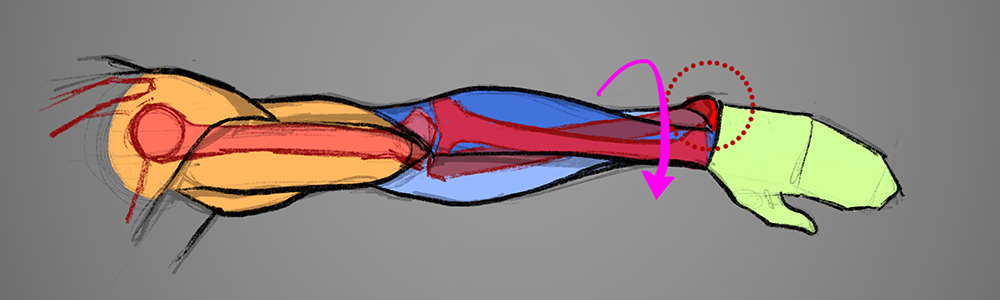
Annotation: Use the head of the ulna (red) as a reference. It must always be on the side of the pinkie.

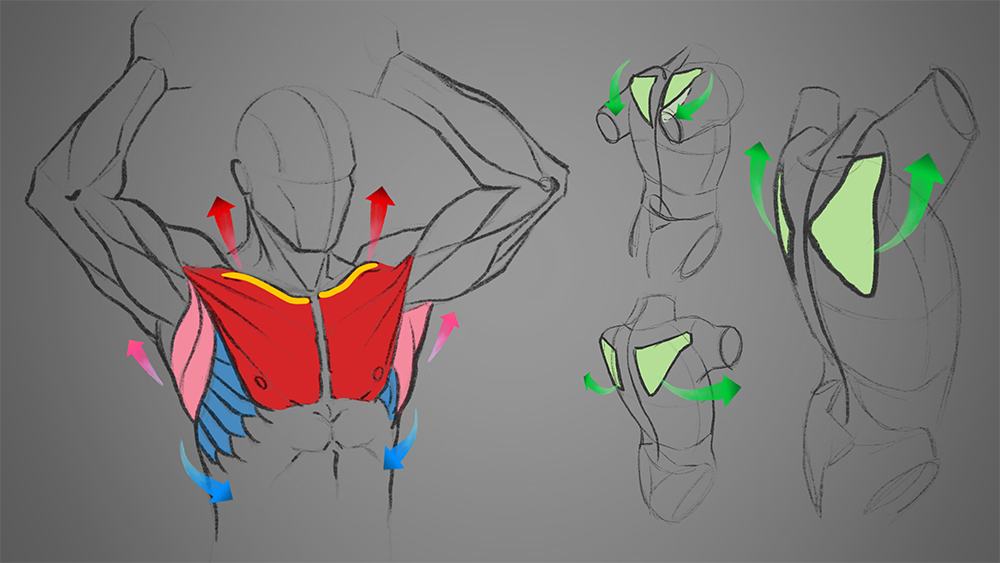
If y'all desire to add realism to your illustrations, the arms' movement is aligned with a whole set of muscles and basic. For example, when drawing a pose in which the arms are raised, do not forget that, in the frontal airplane, the pectoral (red), the latissimus dorsi (pink), and the collarbones (xanthous) are raised; and the serratus (blueish) is visible in the rib muzzle. In the posterior plane (back), remember to include the motion of the scapula (dark-green), as it also contributes to the movements of the arm. You tin can encounter information technology in the following images:
In brusque, to simplify the procedure of drawing an arm, we only must follow three clear guidelines: the proportions, the main muscles, and the reference points.
I promise that my advice, along with my video, will assistance you lot, and soon you lot can easily solve arms in your illustrations.
Thank you lot for reading this tutorial. I encourage y'all to share on Instagram (@Danipuente_conceptart) the notes and illustrations y'all have made following this tutorial. Maybe a creature with iv or half-dozen arms? Get for it! I would love to see it!
If you take whatsoever questions, I am at your disposal: danielpuentemorales@gmail.com.
It has been a pleasure to describe for all of you!
– Daniel Puente
www.Danipuente.com
Instagram.com/danipuente_conceptart/
Artstation.com/danipuente

Source: https://www.clipstudio.net/how-to-draw/archives/164594
Posted by: boothbyfirad1964.blogspot.com
0 Response to "How To Connect The Arms To The Torso Drawing"
Post a Comment